A clean coffee grinder is essential for any coffee enthusiast. Over time, coffee oils and ground beans can accumulate inside the grinder. This buildup can affect the flavor of your coffee and the grinder’s performance. Therefore, regular cleaning is vital for maintaining your equipment and ensuring your coffee’s quality. In this article, we’ll explore how to clean your Breville coffee grinder effectively. We will also discuss why regular maintenance matters, offering a comprehensive guide to keep your coffee grinder in tip-top shape.
Understanding the Importance of Cleaning Your Coffee Grinder
Enhancing Coffee Flavor
Cleaning your coffee grinder significantly enhances the flavor of your coffee. When old coffee grounds remain in the grinder, they can develop a stale taste. This stale flavor can mix with fresh beans during grinding. Consequently, your freshly brewed cup may taste less vibrant and fresh. For coffee lovers, this can be particularly disappointing. By keeping your grinder clean, you ensure that each cup has the pure, rich flavor you desire. Additionally, old oils can also change the aroma of your coffee, impacting your overall coffee experience. Hence, proper cleaning plays a crucial role in achieving the best flavor and aroma.
Extending the Lifespan of Your Grinder
Regular cleaning not only improves flavor but also extends your grinder’s lifespan. Dust, oils, and residue can cause wear and tear on the internal components. Over time, this can lead to costly repairs or the need for a replacement grinder. Cleaning helps prevent the buildup of these harmful elements, keeping your grinder in good working condition. Moreover, by maintaining your equipment, you save money in the long run. A well-cared-for grinder can last for many years, providing beautiful grounds for countless cups of coffee. Thus, cleaning your grinder should be a fundamental part of your coffee routine.

Preparation Before Cleaning Your Breville Coffee Grinder
Gather Necessary Supplies
When preparing to clean your Breville coffee grinder, you need a few essential supplies. First, you’ll require a soft brush, which helps dislodge coffee grounds without damaging delicate parts. A vacuum with a nozzle attachment is helpful for removing loose grounds from hard-to-reach areas. Additionally, having a microfiber cloth on hand is ideal for wiping surfaces. If your grinder is particularly dirty, a small amount of isopropyl alcohol can assist with stubborn stains. Lastly, ensure that you have access to a clean, dry space where you can work effectively. Gathering these items will allow you to clean your grinder thoroughly and efficiently.
Safety Precautions
Before you begin, it’s essential to take some safety precautions. First, make sure your grinder is unplugged to avoid any accidents. Unplugging it ensures that it won’t accidentally turn on during cleaning. Secondly, check for any loose parts that might need attention. A careful inspection can help identify potential issues before they escalate. Additionally, consider wearing gloves if you are sensitive to coffee oils or residues. This extra step can make the cleaning process more comfortable. Taking these precautions sets the stage for a successful cleaning session and ensures your safety throughout the process.
Step-by-Step Cleaning Process for Your Breville Coffee Grinder
Disassemble the Grinder
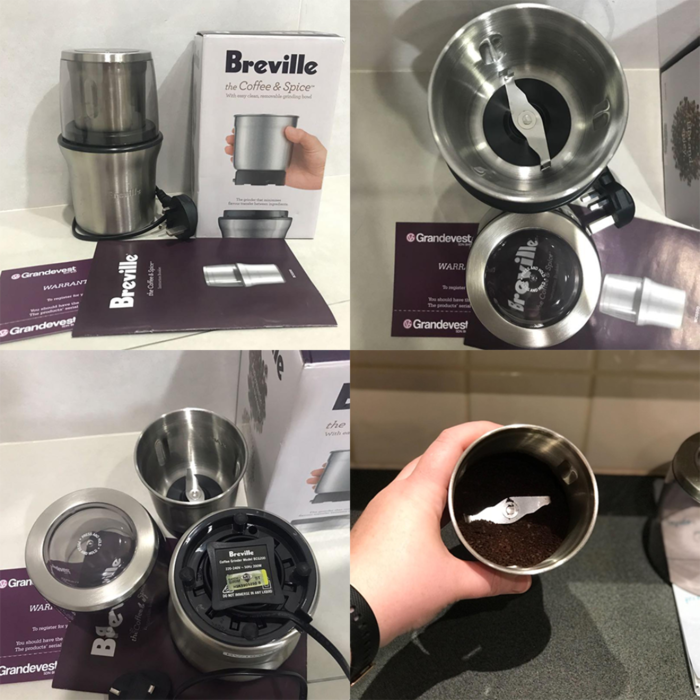
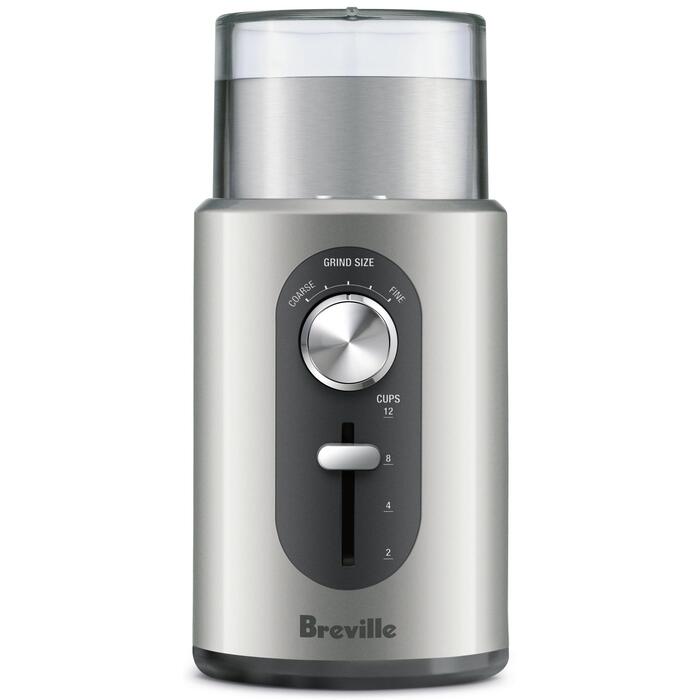
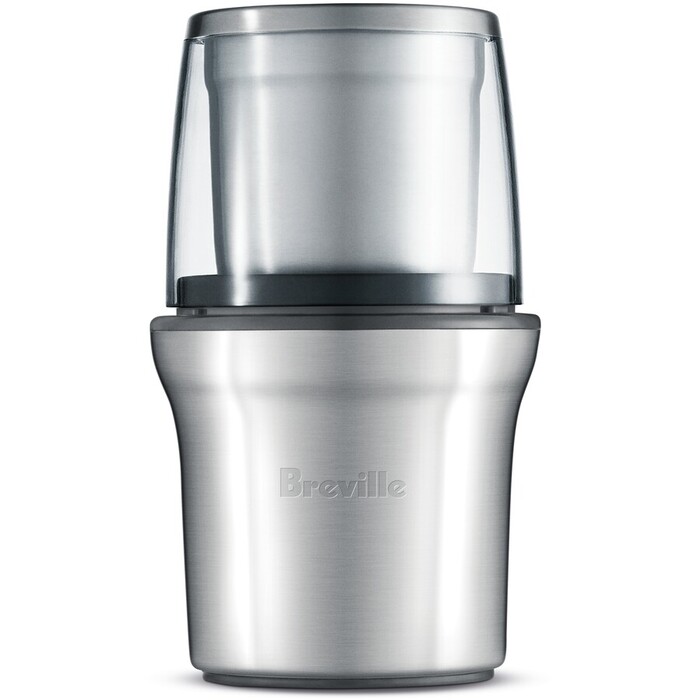
The first step in cleaning your Breville coffee grinder involves disassembling it properly. Start by unplugging the grinder, ensuring it is safe to handle. Depending on the model, you may need to remove the bean hopper and lid first. Gently twist or lift to remove these components without force. Once the hopper is off, you can empty any leftover beans into a clean container. This process helps prevent bean spillage while cleaning. Next, you’ll want to take out the grinding chamber and burrs, if possible. Most Breville models allow for easy removal of these parts for a more thorough cleaning. Refer to your manufacturer’s manual for specific instructions on disassembly.
Brush and Vacuum Loose Grounds
Once disassembled, it’s time to focus on cleaning. Use your soft brush first to sweep away loose coffee grounds. Pay attention to all corners and crevices, as these areas often trap grounds. After brushing, use a vacuum with a nozzle attachment to remove additional loose particles. This step is essential in ensuring that you don’t leave behind traces of old coffee. Be thorough but gentle while vacuuming, as some parts may be delicate. Bypassing this critical cleaning step may lead to a poor coffee experience later. It also makes the following steps easier by reducing the amount of residue that needs to be cleansed.

Deep Cleaning the Components of Your Grinder
Soak Removable Parts
Now that the grinder is free from loose coffee grounds, consider soaking removable parts. If your Breville grinder features parts that can be submerged in warm, soapy water, do so. A mild dish detergent can effectively break down coffee oils. However, ensure that the cleaning solution is safe for the material of your grinder. Items like the bean hopper and the grinding chamber usually hold onto oils and residues. Soaking them for approximately 10-15 minutes will ease the removal of any stubborn buildup. After soaking, scrub gently with a soft cloth or sponge. This gentle action protects the surfaces while removing built-up grime. After cleaning, rinse the parts thoroughly to prevent any soap residue.
Rinse and Dry Thoroughly
After soaking and scrubbing, rinsing is a critical step. Ensure you rinse each component efficiently under running water. This action removes any remaining traces of soap. After rinsing, it’s essential to dry each part thoroughly. Gather a clean towel to wipe down the surfaces. Ensure that no moisture remains, as water can lead to rust or other damage. If possible, allow the parts to air dry in a clean, dry location. This natural drying process can help ensure that every part is moisture-free before reassembly. Rushing this step may compromise the grinder’s integrity and performance. After thoroughly drying the components, you are ready to assemble them back.
Reassembling Your Breville Coffee Grinder
Proper Reassembly Steps
Reassembling your Breville coffee grinder requires some care. Carefully place the grinding chamber back into position, ensuring it fits securely. Following that, reattach the burrs if they were removed. Make sure they’re aligned correctly for optimal grinding performance. Next, position the bean hopper and lid, securing them in place as per the manufacturer’s instructions. Each part should fit snugly, leaving no gaps. Proper reassembly ensures the grinder functions as intended and maintains its performance. Taking your time during this stage is crucial, as any misalignment may lead to subpar grinding results later on. An organized approach to reassembly ensures your grinder is ready for use.
Final Cleaning Touches
After reassembly, a few final touches will enhance the cleanliness of your grinder. Wipe down the outer parts with a microfiber cloth to remove any fingerprints or residual oils. This action not only makes the grinder look appealing but also maintains a clean surface. Additionally, inspecting for any missed spots or stubborn residues can yield good results. If you notice any, feel free to touch them up with a soft brush. Lastly, take a moment to recheck all components to ensure they’re secure and properly aligned. These final steps will solidify your efforts in the cleaning process, preparing your grinder for its next use.
Tips for Maintaining a Clean Breville Coffee Grinder
Regular Maintenance Routine
Establishing a routine for regular maintenance can save you time in the future. Aim to clean your grinder every two weeks to prevent buildup. Regularly wiping down the external parts will make deep cleaning easier during your monthly sessions. Moreover, keeping track of your coffee consumption can help you decide how often to clean. If you use your grinder daily, more frequent cleaning will be necessary. Conversely, if you’re a casual drinker, once a month might suffice. Your routine can adapt based on your coffee habits, allowing flexibility while ensuring cleanliness. This proactive approach leads to better-tasting coffee consistently.
Storing Coffee Beans Properly
How you store your coffee beans also influences the cleanliness of your grinder. Use an airtight container to store your beans. This storage method prevents excess moisture and preserves freshness. Placing containers in a cool, dark spot away from heat can also help. Avoid storing beans near the grinder itself to prevent oil transfer. Proper storage keeps your coffee fresher for longer, ultimately benefiting your grinder. When it comes time to grind, only fill the hopper with the amount you need. This practice limits the amount of leftover beans while also maximizing flavor. Such mindful practices contribute to a clean grinder and a superior coffee experience.

Why Cleaning Matters Beyond Flavor
Preventing Contamination
Cleaning your Breville coffee grinder is vital for more than just flavor enhancement. It also prevents contamination of one blend with another. Grinding different types of coffee beans can lead to cross-contamination, affecting your brew’s taste profile. Old coffee grounds can transfer flavors to new batches, resulting in an undesirable mix. By cleaning between uses, you reduce the chances of this occurring. Consequently, your experience remains consistent, with flavors as intended. Ultimately, this level of clean can influence your perception of the coffee you brew, enhancing the overall experience.
Maintaining Grinder Performance
Keep in mind that a clean grinder performs optimally. Built-up coffee grounds can create uneven grinding, resulting in inconsistent coffee extraction. This inconsistency can seriously affect the final taste of your brew. When grinding beans, they should break down into uniform sizes for even extraction. A well-maintained grinder achieves this goal easily. If your grinder underperforms, it may lead to lackluster coffee and frustration. Therefore, regular cleaning contributes directly to the performance of your equipment. Ensuring that every component functions as intended allows you to enjoy the full range of flavors coffee has to offer.
Conclusion
Cleaning your Breville coffee grinder is an essential task for any coffee lover. Not only does it enhance the flavor of your coffee, but it also extends the lifespan of your grinder. By following a proper cleaning process and maintaining a routine, you ensure that your equipment remains in excellent condition. The satisfaction of brewing a delicious cup of coffee begins with a clean grinder. Therefore, take the time to clean your grinder thoroughly. Your taste buds will thank you for the effort, and you’ll enjoy every sip even more.